
Your cart is currently empty!
A Comprehensive Guide to Camper Van Plumbing Systems
One of the greatest luxuries of camper van life is the ability to have running water for cooking, cleaning, and personal hygiene, even when far from civilisation. A well-designed plumbing system is fundamental to this comfort, allowing you to carry fresh water, dispose of wastewater responsibly, and even enjoy a hot shower.1 This guide will break down the essential components of a camper van plumbing system, from the tanks that hold your water to the methods of heating it.
Core Components of a Camper Van Plumbing System
Every mobile plumbing setup relies on a few key elements working in unison:
1. Water Tanks (The Heart of Your System)
- Fresh Water Tank: This is where your clean, potable water is stored for drinking, cooking, and washing.2
- Material: Always use food-grade plastic tanks to ensure water safety and prevent contamination.
- Location: Can be installed inside the van (under beds, seats, or cabinetry) or underneath the chassis. Internal placement protects against freezing in colder climates, while external placement saves precious interior space.
- Sizes: Camper van fresh water tanks vary widely, typically ranging from 20 litres to 100+ litres. The ideal size depends on your water consumption habits, how many people are travelling, and how often you plan to refill. For example, a solo traveller might be comfortable with 40-60L, while a couple with a shower might aim for 80-120L. Consider performing a “water audit” of your typical daily usage to determine your needs.
- Grey Water Tank: This tank collects wastewater from your sinks and showers.3
- Material: Durable, non-toxic plastic is standard. Often coloured grey for easy identification.
- Location: Frequently mounted underneath the van to maximise interior space, but ensure it’s easily accessible for draining.
- Sizes: Typically sized to be equal to or slightly larger than your fresh water tank. This ensures you have capacity for all the water you use, preventing overflows.
- Regulations (Australia): While there’s no federal legislation in Australia mandating a grey water tank, many local councils, caravan parks, and national parks do have rules requiring self-contained vehicles to carry and properly dispose of grey water. It’s crucial to research the specific regulations for the areas you plan to visit. Always dispose of grey water at designated dump points.
- Black Water Tank (Optional): This is only needed if you have a flush toilet that collects human waste. Many camper van conversions opt for composting toilets or portable chemical toilets, which do not require a black water tank connected to the plumbing system.4
2. Water Pump (The Pressure Provider)
- What: A 12V electric water pump is essential to draw water from your fresh tank and deliver it with pressure to your taps and shower.5
- Why: Creates the necessary water flow for comfortable use, simulating a home plumbing experience.
- Types:
- Diaphragm Pumps: The most common type for RVs, known for their reliability and relatively quiet operation.6 They typically activate when pressure drops (e.g., when you open a tap) and turn off when pressure is restored.
- Flow Rate: Measured in litres per minute (L/min). A common flow rate for a camper van is around 7-12 L/min, which is sufficient for a sink and shower. Higher flow rates might be desired for multiple fixtures or a more powerful shower.
- Accumulator Tank (Optional but Recommended): A small pressure tank installed after the pump.
- Why: It acts as a buffer, reducing pump cycling (the pump turning on and off rapidly) and providing a more consistent water flow. This extends the life of your pump and makes for a smoother user experience.
3. Water Heater (The Luxury of Warmth)
Having hot water significantly enhances comfort. There are several popular options for heating water in a camper van:
- Gas Water Heaters (LPG):
- How: These units use propane (LPG) to heat water on demand or store it in a small tank.
- Pros: Excellent for off-grid camping as they don’t rely heavily on your electrical system (though some require 12V for ignition/fan). Can provide very hot water quickly.
- Cons: Requires a supply of LPG, and proper ventilation is critical for safety. Installation often involves external vents.
- Examples: Suburban, Truma.
- 240V Electric Water Heaters:
- How: These units heat water using standard shore power (240V AC). They typically have a small internal tank.
- Pros: Simple to operate when connected to mains power (e.g., at a caravan park). No gas required.
- Cons: High power draw, making them unsuitable for off-grid use unless you have a very large inverter and battery bank. Heating can be slow.
- Examples: Duoetto (can be 12V/240V dual), small tankless electric heaters.7
- Diesel Water Heaters:
- How: These systems use diesel from your vehicle’s fuel tank to heat water and often provide cabin heating too.
- Pros: Efficient, uses readily available fuel, and often integrated with a heater, saving space. Great for colder climates.
- Cons: More complex and expensive to install.
- Examples: Truma Combi, Webasto.
- Heat Exchanger / Engine Heat:
- How: Utilises the heat from your van’s engine coolant to heat a water tank while you drive.8
- Pros: “Free” hot water while travelling, no additional fuel source needed.
- Cons: Only provides hot water after driving, and water cools once the engine is off. Can be more complex to plumb into the engine’s cooling system.
4. Fixtures and Appliances
- Kitchen Plumbing (Sink & Tap):
- Sink: Compact stainless steel sinks are popular for durability and easy cleaning.9 Consider a deeper sink for dishwashing.
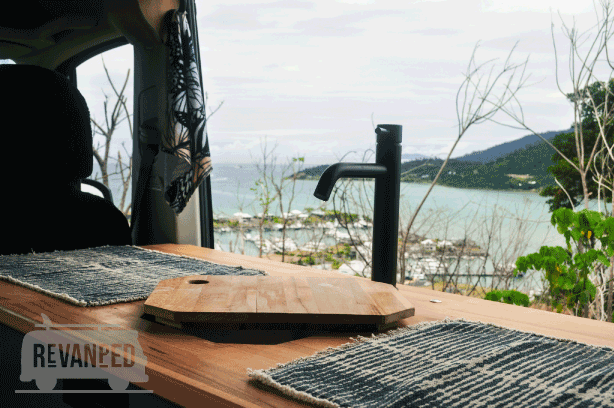
- Tap/Faucet: Choose a low-flow tap to conserve water. A pull-out sprayer can be very versatile. Many 12V taps are available, or you can use a standard household tap with a 12V pump.
- Drain: Connects to your grey water tank. Use flexible plumbing hose and secure connections.
- Showers (Indoor & Outdoor):
- Indoor Shower: Requires a dedicated shower tray, waterproof walls, and proper ventilation to manage condensation. Can take up significant space. Look for low-flow showerheads.
- Outdoor Shower: A simple and popular solution for saving interior space. Can be a hose that connects to a quick-release fitting on the outside of your van, or a dedicated shower box. Ideal for rinsing off after a beach trip or muddy hike.
- External Wash Bay (Hose Connection):
- What: A quick-connect fitting on the exterior of your van that allows you to attach a hose for general washing, bike cleaning, or a simple external shower.
- Why: Offers convenience for various tasks without needing to run hoses through the interior.10 Connects directly to your fresh water supply via the pump.
5. Plumbing Lines (The Veins of the System)
- PEX Tubing: Cross-linked polyethylene (PEX) is highly recommended for camper van plumbing.11
- Pros: Flexible, durable, resistant to freezing and bursting, and easy to work with using push-fit or crimp fittings. It’s also less prone to kinking than some other flexible hoses.
- Flexible PVC Hoses: Suitable for grey water drains, but ensure they are food-grade if used for fresh water.
- Fittings: Use high-quality push-fit or crimp fittings designed for PEX to create secure, leak-proof connections. Hose clamps are essential for securing flexible drain hoses.12
- Drainage: Ensure all drain lines have a slight downward slope to allow water to flow freely into the grey water tank and prevent standing water.13
Planning Your Plumbing System
- Map Your Layout: Before buying anything, sketch out your van’s interior and decide where your water tanks, sink, shower, and water heater will go. Consider accessibility for filling, draining, and maintenance.
- Estimate Water Usage: Be realistic about how much water you’ll need. Every litre counts in a van! Factor in drinking, cooking, washing dishes, and showers.
- Choose Your Hot Water Solution: This decision significantly impacts your power usage (electrical or gas) and overall system complexity.
- Consider Winterisation: If you plan to travel in cold climates, think about insulation for tanks and pipes, or how you’ll drain your system to prevent freezing and damage.
- Safety First: Always use potable (drinking water safe) components for your fresh water system. Ensure all gas connections are installed by a qualified professional if you opt for gas appliances. Proper venting for gas heaters is paramount.
A well-planned and installed plumbing system is an investment in your camper van’s functionality and your overall comfort on the road. With the right components, you’ll have the luxury of running water wherever your adventures take you.